TL;DR
Moving your gear out of your main space is the most effective way to reduce noise. Proper placement, ventilation, and targeted absorption make small spaces sound huge. Foam isn’t enough—think about barriers and airflow, especially in closet setups.
Ever notice how your closet can turn into a surprisingly good recording space? Or how a noisy rig in the corner ruins your focus? The secret isn’t just soundproof foam — it’s about *where* you place your gear and how you control heat and reflections. Moving your rig into a closet or another room often beats buying hundreds of dollars of foam. Learn more about acoustic dampening, placement, and the “Rig in the Closet” setup. It’s a simple shift that can make your workspace silent and your recordings crystal clear.
In this guide, you’ll learn why distance is king, how to handle heat in enclosed spaces, and where to put absorption for the best results. Whether you’re recording vocals, running a high-power AI rig, or just trying to quiet your setup, these strategies will help you get the sound you want without turning your space into a noisy echo chamber.
Acoustic dampening
& the rig in the closet.
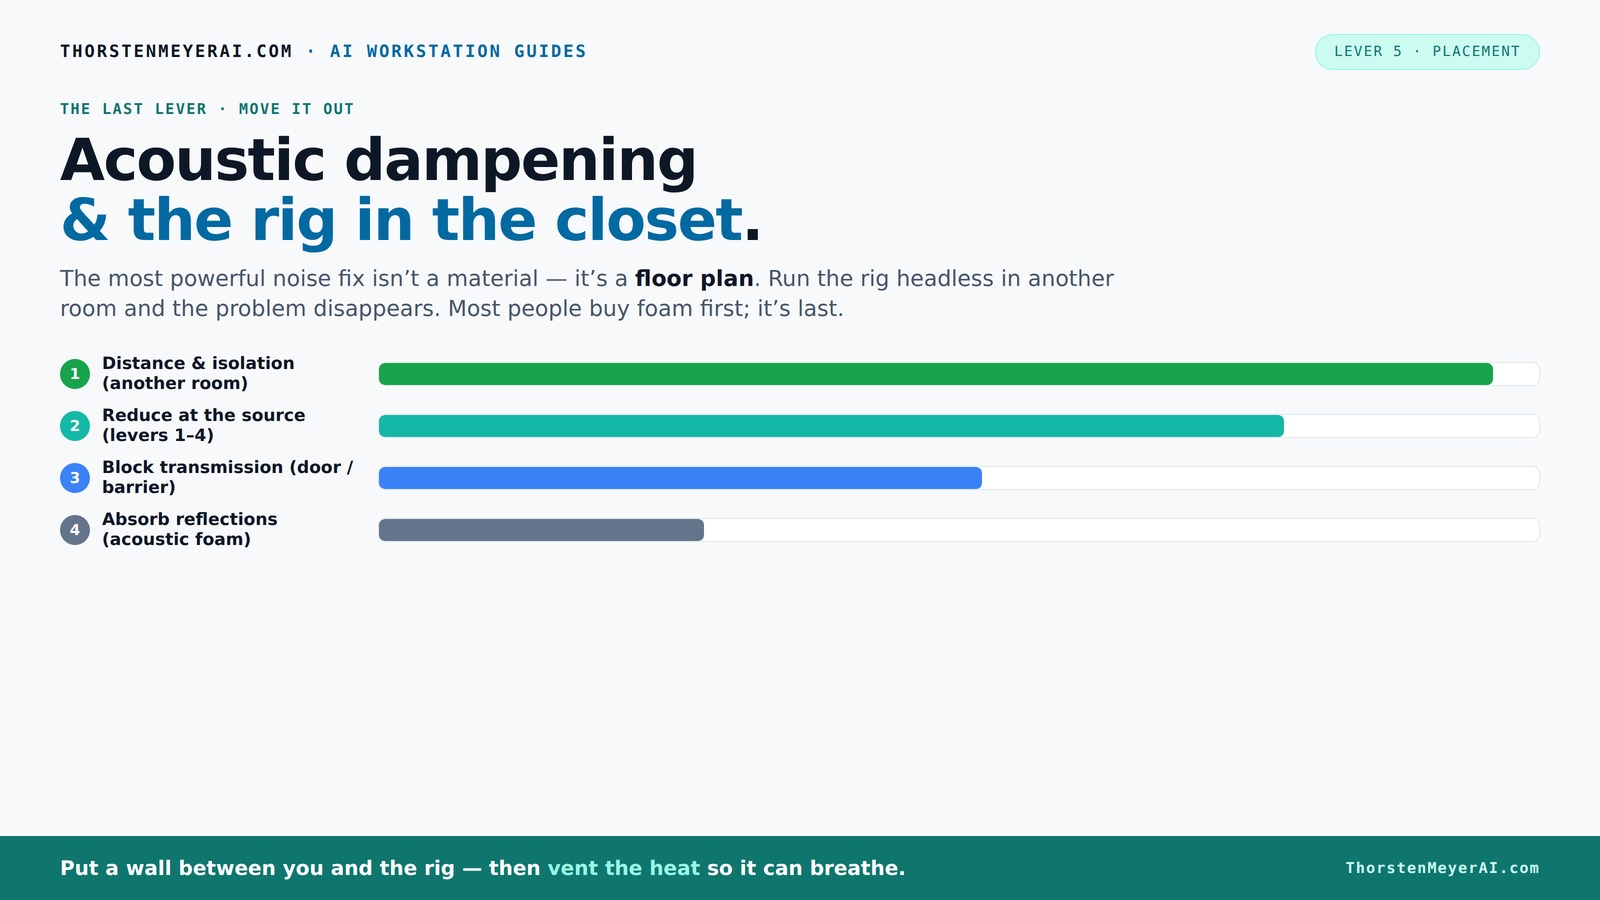
The most powerful noise fix isn’t a material — it’s a floor plan. A rig you can’t hear because it’s in another room beats any amount of foam. Tap the approaches in Part 1 to see what actually works.
(another room)
(levers 1–4)
(door / barrier)
(acoustic foam)
Contain the noise, not the heat
Key Takeaways
- Moving your rig into a separate room, ideally with a wired connection, is the most effective way to cut noise.
- Proper ventilation in a closet or cabinet prevents heat buildup, which can cause fans to roar and damage your gear.
- Placement of absorption panels and bass traps in reflection points and corners dramatically improves sound quality.
- Sealing gaps and adding soft coverings on doors and vents stops sound leaks and reflections.
- Don’t rely solely on foam — combine barriers, placement, and airflow for the best quiet, cool setup.

Focusound 52 Pack Acoustic Foam Panels 1" x 12" x 12" Sound Proof Foam Panles Soundproofing Noise Cancelling Wedge Panels for Home Office Recoding Studio with 300PCS Double-Side Adhesive
- Soundproofing Design: Triangular grooves for noise absorption
- Includes Adhesive Tape: 300pcs double-sided adhesive for easy installation
- Easy Shape Recovery: Soak in water to restore shape within 48 hours
As an affiliate, we earn on qualifying purchases.
As an affiliate, we earn on qualifying purchases.
Why Distance Is Your Best Noise Solution
Distance and isolation are the heavyweight champions of noise control. When you put physical space between your rig and your ears, the sound drops dramatically. Think of it like turning down the volume knob—only better. Moving a loud rig into a closet or another room cuts noise by 80-90%, according to soundproofing experts [2].
For example, placing a GPU rig in a basement or separate room can significantly reduce the noise heard in the main workspace. This setup allows recording vocals in a small closet with minimal interference from the rig’s noise. The rig’s loud operation is effectively isolated, improving the overall environment. You can also explore travel, tourism, and regional culture for more insights. This approach demonstrates how strategic placement can outperform other treatments like foam barriers.
And with high-speed network connections, you don’t even need to be near your machine. SSH into your rig or run your inference API remotely. Your workspace stays silent, while the machine does its heavy lifting elsewhere. Done right, this simple move outperforms any foam or barrier.

Professional Studio Recording Microphone Isolation Shield, Pop Filter,High density absorbent foam is used to filter vocal. Suitable for Blue Yeti and other condenser microphones (AO-504 With Stand)
- Package Includes: Isolation shield, adapters, stand, manual
- Adjustable Height: Height can be freely adjusted
- Effective Sound Filtering: Absorbent cotton interior for clarity
As an affiliate, we earn on qualifying purchases.
As an affiliate, we earn on qualifying purchases.
The "Rig in the Closet" Setup — How to Do It Right
Placing a hot, noisy machine in a closet can be effective — but only if heat is managed properly. Trapped heat is the enemy of both performance and noise control. A sealed closet packed with high-power components, such as a 600W GPU, can quickly become a heat trap. The key is ensuring proper airflow and cooling methods.
For a successful setup, consider these points:
- Install passive vents or ducted exhaust fans to move hot air out.
- Use thermostatically controlled fans to prevent overheating.
- Choose a closet with enough space for airflow, not just a tiny cubby.
- Incorporate active cooling, like an AIO radiator exhausting heat outside the closet, to keep temperatures down see how to optimize your closet setup.
Additionally, soundproof enclosures with air vents can reduce noise while maintaining airflow. Many commercial solutions combine absorption and ventilation, providing a quiet, cool environment. For more tips, visit Green Travel List’s guide on acoustic setup. DIY options include adding a quiet exhaust fan and sealing gaps with weatherstripping to improve airflow and reduce noise leakage [2].
Proper ventilation is critical; without it, heat buildup can cause thermal throttling and increased fan noise, reducing performance and risking hardware damage. Check out more on acoustic dampening and setup. Effective airflow management ensures the rig operates quietly and efficiently, transforming a potential heat problem into a manageable aspect of your setup.
For practical examples, see [this custom closet setup](https://thorstenmeyerai.com/reduce-heat-noise-ai-workstation/), which balances heat dissipation and noise reduction through strategic airflow and insulation.

Audimute Soundproofing Acoustic Door Seal Kit - Door Sweep and Seal - (Standard Size)
- Includes Door Seal and Sweep: Door Seal (3/16" x 1/2" x 25') and Door Sweep (1/2" x 1.5" x 4')
- Fits One Standard Door: Designed for a single standard-sized door
- Reduces Sound Transmission: Blocks sound from passing through door gaps
As an affiliate, we earn on qualifying purchases.
As an affiliate, we earn on qualifying purchases.
Where to Place Absorption, Foam, and Bass Traps for Small Spaces
In a tiny closet, placement of absorption materials makes or breaks your sound quality. The first rule? Focus on the main reflection points — behind and around the microphone. You want the mic to pick up your voice, not echo or bounce off hard surfaces.
For low frequencies and bass buildup, corners are prime real estate. Small closets tend to turn into bass traps themselves, with standing waves forming in the corners. Adding bass traps or extra foam in these spots can tame boominess and make your recordings clearer [3].
Here’s a quick guide:
- Start with foam panels at the reflection points — behind your mic and directly in front.
- Place bass traps in the corners to control lows.
- Use movable panels or blankets to fine-tune your space as needed.
- Avoid placing foam directly on the door or in places where sound can escape easily.
Effective placement of absorption and bass traps involves addressing the specific acoustic challenges of small spaces. Reflection points are critical because sound waves bounce most intensely there, creating echoes and muddiness. Bass buildup in corners is especially problematic because standing waves tend to amplify low frequencies, resulting in boomy or muffled sound. Properly placed traps and foam can balance these issues, leading to clearer, more professional recordings. The key is to find the right balance—enough absorption to control problematic reflections and bass, but not so much that the room sounds dead or unnatural.
Placement strategies such as positioning foam on the wall behind the mic, installing bass traps in corners, and using adjustable panels for fine-tuning have been shown to significantly improve sound clarity. For detailed guidance, visit this resource on acoustic treatment. Since every small space is unique, experimentation with placement is essential to optimize acoustics effectively.

Vikye Vocal Dampener, Voice Training Aid with Ergonomic Design for Warm Ups, Sound Reduction, Stress Relief and Improved Voice Control
As an affiliate, we earn on qualifying purchases.
As an affiliate, we earn on qualifying purchases.
How to Seal the Door and Gaps Without Killing Your Soundproofing
Sound leaks through doors, cracks, and vents. The first step? Seal all gaps with weatherstripping or acoustic sealant. A door with even tiny cracks acts like a speaker’s port, letting sound escape and noise enter.
For closet doors, adding a heavy blanket or acoustic curtain can drastically cut reflections and sound leaks. For better results, install a door sweep or gasket to block the gap at the bottom. If you want serious soundproofing, consider a solid core door and sealing all weak points [2][4].
Sealing gaps isn’t just about reducing noise; it also prevents sound from bouncing around inside the space, which can create echo and muddiness. Proper sealing minimizes external noise intrusion and internal reflections, leading to a cleaner recording environment. However, overly sealed spaces can trap heat, so combining sealing with adequate ventilation is essential. The materials used—like weatherstripping or acoustic sealant—are crucial for durability and effectiveness. Properly sealed gaps can significantly reduce noise ingress, but no method is perfect. Combining sealing with other treatments like absorption and barriers yields the best results.
In practice, sealing the closet door with weatherstripping and adding a gasket at the bottom can reduce external noise by over 70%. Using a heavy acoustic curtain over the door further minimizes reflections and external sound intrusion, creating a more controlled environment. Paying attention to small gaps and leaks is a simple but effective step to improve overall acoustic isolation.
Common Mistakes That Ruin Small-Space Sound Quality
Many DIY closet setups encounter issues due to common mistakes. For example, placing foam randomly without considering reflection points can lead to uneven sound treatment. Ignoring gaps around vents or handle holes allows sound to leak and reflections to worsen.
Another mistake is neglecting low-frequency control. Without bass traps, rooms tend to sound boomy and muddy, especially if walls are parallel. Improper placement of absorption materials can also result in over-damping, making the space sound unnatural or dull. Over-treating a small room can deaden the sound excessively, reducing natural vocal and instrument clarity. Additionally, heat buildup in sealed closets can cause hardware to throttle or overheat, increasing noise and risking damage [3][5].
Essentially, treating reflections alone is insufficient. Sealing gaps, managing heat, and strategic placement are vital for effective acoustic treatment. Overlooking any of these factors can undermine the entire setup, resulting in subpar sound quality and potential hardware issues. The key to an optimized small-space environment is balancing effective sealing, proper acoustic treatment, and heat management to achieve the best sound and performance.
Best Closet Setup for Voice, Instruments, or AI Rigs
Different applications require tailored approaches. For vocals, focus on reducing reflections and controlling low frequencies with bass traps and soft materials close to the mic. For instruments or amps, dampen the room and prevent sound bleed by sealing gaps and adding absorption on reflective surfaces.
High-power AI rigs benefit most from placement in a well-ventilated, sealed closet, with heat management and noise control in mind. Keep in mind: the closer the gear is to your mic, the more reflections you'll get, so treat accordingly.
For example, a singer-songwriter might set up a closet with foam, a thick blanket over the door, and corner traps. Meanwhile, a developer running inference in a ventilated enclosure reports much less noise and overheating. Each setup should be tailored to its purpose, always balancing sound quality and heat dissipation [2][3].
Understanding your specific needs and constraints allows for effective treatment choices. For vocals, prioritize reflection control; for rigs, focus on heat dissipation and noise reduction. Combining proper placement, absorption, and ventilation maximizes the setup’s effectiveness across different applications.
Frequently Asked Questions
Do I need soundproofing or acoustic treatment?
For most small spaces like a closet, acoustic treatment focuses on reducing reflections and echo. Complete soundproofing, which prevents sound from escaping, is more complex and usually unnecessary unless noise is a big concern. Sealing gaps and adding absorption are enough for most home setups.Where should I place the mic in a closet for the best sound?
Place the mic away from reflective surfaces like walls or doors. Ideally, position it in the 'sweet spot' — about 6-12 inches from a foam panel or bass trap on the reflection point behind the mic. Use a reflection filter if possible for even better isolation.Should foam go on the walls, behind the mic, or in the corners?
Start with foam panels at reflection points — behind and in front of the mic. Add bass traps in the corners to tame low frequencies. Avoid placing foam directly on the door or floor, as it may do little to prevent leaks and reflections.How much treatment is enough in a small closet?
Focus on key reflection points and corners. A handful of foam panels, some bass traps, and sealing gaps usually make a big difference. You can always add more later if needed, but start simple and adjust based on your sound.Will thick blankets or a rug help as much as foam panels?
Yes, thick blankets and rugs absorb sound and reduce reflections similarly to foam. They’re a cost-effective alternative, especially for sealing gaps or covering hard surfaces. Just ensure they’re not so thick that they block airflow if heat is an issue.Conclusion
Think of your closet as a quiet sanctuary, not just a box to hide your gear. Proper placement, ventilation, and strategic absorption turn a tiny space into a professional-grade recording or inference environment. Remember: the best noise reduction isn’t just about absorbing sound — it’s about controlling where it goes.
Next time you set up your rig, ask yourself: how can I move it, breathe for it, and treat the key reflection points? The smallest tweaks often deliver the biggest sound improvements. Your quiet, efficient workspace is just a few smart moves away.