TL;DR

Get travel and outdoor gear delivered free with Prime
- Fast, free delivery on millions of items
- Prime Video, Amazon Music and more included
- Member-only deals all year
The best kayak roof rack for coastal road trips is a compatible system whose combined rack, crossbar, vehicle, and kayak setup stays within the vehicle’s dynamic roof-load limit. Compare J-cradles, saddles, and stackers by hull fit and loading effort, then secure the boat as its maker directs and rinse and inspect the hardware after salt exposure.
A kayak can feel feather-light beside the water and suddenly seem enormous when you have to lift it onto a wet SUV roof beside a windy beach. That is why the best kayak roof rack for coastal road trips is more than a sturdy-looking pair of cradles. It has to fit your kayak, your crossbars, your vehicle’s moving-load limit, and the way you actually load and travel.
This guide helps you compare practical replacements for a simple J-bar rack, including the Thule Compass, Thule Hull-a-Port XTR, Mrhardware Heavy-Duty J-Bar, and Forluck Universal J-Bar. Product specifications and fit can change, so treat listed dimensions as a starting point and confirm the exact combination with current manufacturer information before you buy.
You’ll also get a clear way to check roof capacity, choose a rack style, secure the bow and stern, and care for hardware after salt and sand. A few minutes spent checking the setup at home can save a tense roadside stop with straps humming in the wind.
Count the rack, mounts, crossbars, and kayak against the vehicle’s dynamic roof-load limit; the lowest-rated component sets the limit.
Choose J-cradles, saddles, or stackers based on hull fit, roof space, boat count, and how safely you can load.
Confirm current fit guidance for your exact vehicle year, crossbar shape and spread, carrier, and kayak before buying.
Use the specified straps and attachment points, avoid crushing the hull, and recheck the setup after a short drive.
Rinse and dry coastal gear after use, then inspect straps, fasteners, and contact points for salt, grit, corrosion, or wear.
Start with the load limit, not the rack label
The best kayak roof rack for coastal road trips begins with a vehicle-and-gear combination that stays below the vehicle’s dynamic roof-load limit. That moving limit applies while you drive, and it must cover the crossbars, carrier, mounts, and kayak together. The lowest-rated part of the system sets the ceiling.
For example, say your vehicle manual lists a 75-pound dynamic roof limit. If the crossbars and kayak carrier together weigh 18 pounds, the remaining theoretical capacity is 57 pounds for the kayak and any other roof cargo. If your kayak weighs 60 pounds, the setup exceeds that vehicle limit even if the rack maker advertises a higher capacity. The rack’s number does not cancel out the vehicle’s.
Check the manual for your specific model year and roof configuration; panoramic roofs, factory rails, and aftermarket bars can have different rules. Do not use a parked or static roof figure as permission to drive with a heavier load. The forces on the roof change when you brake, turn, and meet crosswinds along an exposed shoreline.
Count the complete load while driving. A compatible rack can still be the wrong choice if the vehicle or crossbars have a lower limit.
Before buying, write down the vehicle limit, crossbar limit, carrier limit, and kayak weight. A touring kayak that is easy to carry by hand can still leave little capacity once you add a tall set of bars and a robust carrier. If one figure is unclear, check the vehicle or rack maker’s official guidance rather than guessing.
Products Worth Considering

DJI Mini 4K Fly More Combo

DJI Osmo Mobile 8 Phone Gimbal with Mic Mini Transmitter, Infinity Black

Bose QuietComfort Ultra Wireless Noise-Cancelling Headphones with Spatial Audio, Black
As an affiliate, we earn on qualifying purchases.
Compare rack styles by how your kayak sits and loads
The best kayak roof rack for coastal road trips is the style that supports your hull correctly and suits the way you lift it. J-cradles hold a kayak on its side and free up roof width; saddles support more of the hull; stackers let you carry multiple compatible boats upright. Each solves a different problem.
| Style | What it does well | Tradeoff to check |
|---|---|---|
| J-cradle | Uses roof width efficiently and suits many kayaks | Raises the boat and can make lifting awkward |
| Saddle | Supports the hull across a broader contact area | May take more roof width; check hull shape and fit |
| Vertical stacker | Can carry multiple compatible kayaks | Needs careful spacing and a loading plan |
Imagine loading a 12-foot touring kayak onto a tall crossover after a dawn paddle. A J-cradle may keep the boat compact across the roof, but getting it overhead can be the hard part. A side-loading aid, roller, lift-assist feature, or second person may make that trip safer and less exhausting.
For a wide fishing kayak, broad support may matter more than saving roof space. Check the kayak’s hull shape and the carrier maker’s approved fit guidance; a listed width alone does not prove that the contact points suit the hull. With two kayaks, a stacker can help, but only when the boats, crossbars, clearances, and total roof load work together.
Some buyers prefer a 45-degree J-style design because that describes the rack they are replacing. Treat the angle as a product detail, not a safety verdict. Proper fit, supported contact points, and approved tie-down methods matter more than a familiar-looking shape.
Compare replacement racks by the specs they actually share
Replacement candidates should be compared by verified specifications, not by a broad label like “universal.” In the available comparison data, the reference J-bar is listed as alloy steel with an anti-rust coating, a 36-inch maximum kayak width, and a 45-degree J-shaped design. The alternatives overlap with some of those details, but the table shows where the available specifications stop.
| Rack | Listed material | Width or design detail listed | What to verify |
|---|---|---|---|
| Thule Compass Kayak and SUP Roof | Plastic | 36-inch maximum kayak width | Exact vehicle, bar, kayak, and mounting fit |
| Thule Hull-a-Port XTR | Aluminum | J-cradle or two-boat stacker design; width not specified | Boat configuration, width fit, and bar compatibility |
| Mrhardware Heavy-Duty J-Bar | Carbon steel | 36-inch maximum kayak width | Corrosion care, vehicle fit, and included hardware |
| Forluck Universal J-Bar | High-strength alloy steel | Width not specified | Approved bar dimensions and kayak fit |
This is a specification comparison, not a claim that one option fits every car or boat. For instance, a 36-inch width listing may help narrow choices for a kayak of similar width, yet the hull profile and carrier contact points still need checking. A rack material description also does not tell you how every bolt, coating, or strap will hold up after repeated salt exposure.
Use the table to build a shortlist, then open the current manufacturer fit guide for your vehicle’s model year and crossbar type. Confirm the bar width, bar spread, mounting method, kayak dimensions, and included tie-down parts. Product details can change; the exact SKU and current instructions matter more than a search result title.
If the original product listing you had in mind is no longer easy to find, don’t assume it has been discontinued or that a similarly named rack is identical. Compare the actual specifications and fitting instructions for the item you can source. The best kayak roof rack for coastal road trips is one that is confirmed for your real setup, not one that merely resembles the old rack in a photo.
Check crossbar fit before you trust a “universal” claim
A kayak carrier fits only when its mounts work with the vehicle’s crossbars and stay within the carrier maker’s stated bar-width and spacing limits. Factory, round, square, and aerodynamic bars do not all use the same mounting hardware. A universal claim is a useful clue to investigate, not proof that your bars are approved.
Picture a compact wagon with low-profile aerodynamic bars. A J-bar that clamps neatly to a square aftermarket bar may need a different attachment kit—or may not be approved for that aerodynamic profile at all. If you force a clamp onto an incompatible shape, it can sit crooked, leave too little contact, or loosen as the car moves.
Check the carrier’s instructions for the allowed bar dimensions and the minimum or maximum bar spread. The spread is the distance between the crossbars. It affects where the kayak rests and how the load transfers through the carrier, so the bar arrangement should match both rack and kayak guidance.
Use this quick sequence before ordering:
- Identify your exact vehicle year and roof setup. Note factory rails, fixed points, or aftermarket crossbars.
- Measure or confirm the crossbars. Record their type, width, and spacing from the maker’s fit guide.
- Check the carrier’s approved range. Look for bar shape, clamp range, and spread limits.
- Confirm the kayak fit. Compare hull width, length, weight, and any required support orientation.
- Save the current instructions. Follow the specified mounting points and torque or fastening directions.
That five-step check is especially useful if you switch cars between trips. A carrier that worked on a friend’s SUV may not mount correctly on your own vehicle, even when both have roof bars. Keep the vehicle manual and rack instructions in the glove box or phone so you can settle a fit question before loading at the coast.
Make loading manageable before you reach the beach
A manageable loading plan protects your back, your kayak, and the paintwork around the roof. The best setup depends on kayak weight, vehicle height, and your safe lifting ability, not just the carrier style. A solo paddler with a lightweight touring boat has different needs from someone moving a wide fishing kayak onto a tall truck.
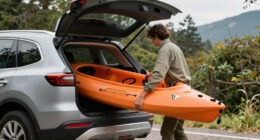
Try the whole routine at home on flat ground before departure. Lay out the straps, check where the bow and stern lines will attach, and rehearse how the boat will move from the ground to the rack. If your car is tall or your kayak is heavy, use a compatible side-loading aid, roller, lift assistance, or a second person. Stopping halfway through a lift because you cannot reach the far cradle is a poor surprise on a windy roadside.
As you load, follow the kayak and carrier instructions for orientation and support points. Keep the hull from scraping grit across the roof. A small patch of beach sand caught between a boat and a contact pad can act like sandpaper as the kayak shifts.
- Choose a calm, level loading spot away from traffic and loose gear.
- Use the correct straps and route them through the carrier as its maker shows.
- Tighten enough to stop movement without crushing or deforming the hull.
- Ask for help or use an aid if the lift feels strained or unstable.
For example, after a late-afternoon paddle, a tired driver may be tempted to throw the kayak overhead quickly and leave. A practiced routine makes that moment calmer: brush sand from the contact points, settle the hull, fasten the straps, then check both sides before driving. Ease of loading is part of choosing the best kayak roof rack for coastal road trips because you repeat the task at both ends of the journey—and often at every launch in between.
Secure the kayak for highway wind and coastal crosswinds
A secure kayak stays in its intended position because the carrier, crossbars, and tie-downs work as a system. Use the rack’s specified straps and the vehicle or rack maker’s recommended attachment points. Bow and stern lines can help control movement on a long or windy drive, but their routing and attachment should follow the equipment instructions.
On an exposed coastal highway, a gust can push against the broad underside of a kayak like a sail. A strap that feels snug in a sheltered driveway may settle after the first stretch of rough pavement. Stop after a short initial drive and recheck the straps and lines; continue checking at regular breaks, especially after strong wind or heavy rain.
Straps should prevent movement without crushing the hull. If the kayak is soft-sided or has a shape that deforms under pressure, overtightening can cause damage even when the boat seems firmly held. Keep loose strap tails secured so they do not flap, whistle, or distract you.
Do a short-drive check. After the first few miles, stop somewhere safe and confirm that the kayak has not shifted and every strap remains secure.
Imagine a 90-minute drive to a cove with crosswinds around headlands. A quick check at the first safe rest area lets you catch a settling strap before it becomes a bigger problem. Bow and stern lines are not a substitute for the carrier straps, nor do they make an incompatible rack safe. Follow the specified tie-down points, keep the complete load within its limits, and obey the vehicle and rack makers’ speed guidance.
Do not attach lines to a point that was not intended for the load. If you cannot identify suitable attachment points, consult the vehicle manual or manufacturer rather than improvising with trim, plastic panels, or a delicate bumper edge.
Keep salt, sand, noise, and extra drag from spoiling the trip
Coastal air leaves a fine film of salt on metal, while wet straps and gritty sand can wear equipment during repeat use. Choose a rack with materials and hardware suited to your conditions, then rinse, dry, and inspect it after coastal trips. Corrosion resistance helps, but it does not remove the need for care.
For instance, after a weekend launching in salty spray, rinse the carrier and exposed fasteners with fresh water once you get home. Dry them before storage, and look for rust, coating damage, frayed strap edges, cracked buckles, or grit trapped at contact points. If you find wear or corrosion, follow the maker’s maintenance guidance and replace parts only with compatible components.
An empty rack can whistle and add drag; a kayak increases wind resistance further. You may hear a thin, high note above the road noise or notice the vehicle using more fuel or battery range than usual. When the carrier is designed to come off and you do not need it, removing it can reduce noise and drag. Follow the rack maker’s directions if it is intended to stay installed.
Travel convenience matters, too. A locking feature can help secure a carrier when you stop for lunch, but it does not replace checking straps or protecting the kayak. Think through where you will park, whether you can reach the straps safely, and how quickly you can inspect the system at a rest stop.
Salt and sand make a useful post-trip ritual simple: fresh water, a dry cloth, and a close look at the metal and webbing. That few-minute routine is easier than discovering a seized fastener or a weakened strap on the next trip. It also helps you decide whether a corrosion-resistant finish is enough for your routine or whether your coastal use calls for more frequent cleaning and inspection.
Use this pre-trip check before you pull away
A good pre-trip check confirms that the whole setup fits, stays within its limits, and remains easy to inspect. Before driving, compare the vehicle, crossbar, carrier, and kayak details against their current instructions. Then look and feel for loose hardware, poor strap routing, or a boat that can shift.
Say you’re leaving for a dawn launch after loading in the dark. A checklist prevents the easy-to-miss details from slipping through: a strap tail hanging loose, a clamp not fully seated, or a stern line attached to a flimsy panel. Keep a small headlamp and the rack instructions with your travel gear so you can see each contact point clearly.
- Capacity: The complete moving roof load is within the lowest vehicle, bar, or carrier limit.
- Compatibility: The carrier is approved for your exact crossbar shape, width, and spacing.
- Kayak fit: The hull, width, length, weight, and orientation suit the supports.
- Fastening: Straps and any bow or stern lines follow the maker’s instructions.
- Condition: Mounts, buckles, webbing, and contact pads show no damage or grit.
- Recheck plan: You know where you can stop safely after the first short drive.
Take a moment to gently check for movement before departure. If the boat slides or the mounts shift, stop and correct the setup rather than driving slowly and hoping it settles. Once on the road, recheck at the first safe stop and at regular intervals. A little routine turns a roof load from a source of worry into one less thing competing with the sea breeze and the route ahead.
Frequently Asked Questions
What type of roof rack is best for a kayak?
It depends on your kayak and how you load it. J-cradles save roof width, saddles support more of the hull, and stackers can carry multiple compatible boats. Check hull fit and loading height before choosing.
Can I carry a kayak on factory crossbars?
Often, but only when the vehicle and crossbars are rated for the complete load and the carrier is approved for that bar shape and spacing. Check current vehicle and rack fit guidance for your exact setup before loading.
How do I know if my car can carry my kayak?
Find the vehicle’s dynamic roof-load limit in its manual, then count the crossbars, rack, mounts, kayak, and other roof cargo. The lowest-rated vehicle, bar, or carrier component sets the maximum for driving.
Do I need bow and stern lines?
Follow the rack and vehicle makers’ instructions for your setup. Bow and stern lines can help control movement on long or windy drives, but use suitable attachment points and keep the carrier straps in place as directed.
Can one person load a kayak onto a roof rack?
It depends on the kayak’s weight, roof height, and what you can lift safely. A compatible roller, side-loading aid, lift-assist feature, or second person can help. Practice on level ground before attempting a beachside roadside load.
How should I protect a kayak rack from saltwater?
After coastal use, rinse the rack with fresh water, dry it, and inspect metal parts, fasteners, straps, buckles, and contact pads. Salt and sand can wear hardware and webbing, so follow the maker’s care guidance and replace damaged compatible parts.
Conclusion
Choose the rack that fits your vehicle and kayak on paper, then confirm that fit in the current maker instructions. Keep the full moving load within the lowest rated limit, practice loading before the trip, and recheck the straps after the first short drive.
When the gear is secure and clean, you can leave the road behind with the kayak riding quietly overhead and the salt air waiting at the water’s edge.